Introduction
Most restaurants have spent years perfecting their physical menu: the sections, the descriptions, the carefully considered order of dishes. Going digital means translating all of that into a format that works for online browsing, ordering, and payment. The import step is where most of that work either carries over cleanly or falls apart.
The process looks deceptively simple: upload a file, hit import, done. In practice, 84% of delivery customers say they'd order through a restaurant's own website.
A broken or incomplete online menu means missed orders — before a customer ever reaches checkout.
How well your import goes depends on three things: which platform you choose, which import method you use, and how clean your menu data is before you start. Get those right, and the rest of the process follows.
Key Takeaways
- Convert each dish into a digital product with a title, description, price, image, and modifier options before importing.
- Your platform (Shopify, Square, Toast, etc.) shapes which import methods are available to you.
- CSV import, POS sync, and manual entry each suit different restaurant sizes and setups.
- Clean, complete menu data before you import — it's the most common source of errors.
How to Import Your Restaurant Menu to an Online Store
Step 1: Choose Your Online Store Platform
Platform choice determines everything: how items are structured, what import formats are accepted, and how your menu displays to customers.
The main categories:
- E-commerce platforms (Shopify): Treat menu items as "products" with "variants." Flexible, but requires some restaurant-specific setup.
- Dedicated restaurant ordering systems (Square Online, Toast, ChowNow): Built for food service. Native menu builders with "items," "modifiers," and "categories" already baked in.
- Third-party delivery marketplaces (DoorDash, Uber Eats, Grubhub): High customer reach, but plan-based commissions ranging from 15–30% per order.
For CSV-based import specifically, Shopify, Square, and Toast all publish public documentation with supported file formats. ChowNow and DoorDash are more menu-builder oriented — their import workflows are typically handled during onboarding rather than via self-serve CSV upload.
Choose your platform before formatting your data. A Shopify CSV and a Toast bulk import template are not interchangeable.
Step 2: Format Your Menu Data for Import
Every platform has its own required fields, but a well-structured menu spreadsheet should include:
| Field | Notes |
|---|---|
| Item name | Required on all platforms |
| Description | Drives conversion — not optional |
| Price | No currency symbols for Toast; plain numbers |
| Category | Appetizers, Mains, Desserts, etc. |
| Image URL | Link to a hosted image file |
| Modifier/variant options | Size, add-ons, substitutions |
| Dietary tags | Vegan, gluten-free, contains alcohol |
Common formatting pitfalls by platform:
- Shopify: Requires UTF-8 encoding with LF line endings; blank columns overwrite existing data when "overwrite" is enabled
- Square: Accepts
.xlsxand.csv, but not.xlsor.xlsm; spreadsheet editors can strip leading zeros from SKUs - Toast: Price fields cannot include
$or other currency symbols and must be under 25 characters
The same dish requires different field structures on each platform. Build a field map before you start formatting.
Step 3: Import Your Menu Items into the Platform
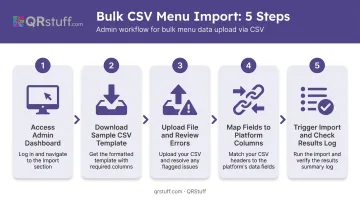
For bulk CSV import:
- Access the product/item import section in your platform's admin dashboard
- Download the platform's sample CSV template to confirm required columns
- Upload your completed file and review any error warnings before confirming
- Map fields if prompted — for example, "Item Name" → "Product Title" in Shopify
- Trigger the import and check the results log for failed or incomplete rows
For POS sync:
If you're on Square or Toast, your item catalog may already exist in the POS system. Enabling online ordering typically syncs that catalog automatically, avoiding duplicate data entry.
For manual entry:
Practical only for menus under 15 items. Add each item through the admin panel, set prices, upload images, and configure modifiers individually. This becomes error-prone and time-consuming at scale.
After import, organize items into collections or categories — Appetizers, Mains, Sides, Drinks, Desserts — to replicate the section structure of your physical menu. Most platforms don't do this automatically from a CSV.
Step 4: Configure Fulfillment and Publish Your Store
A completed import doesn't mean a live store. Before customers can order, you need to configure:
- Fulfillment options: Pickup windows, local delivery radius, estimated prep times
- Operating hours: So the store only accepts orders when the kitchen is open
- Payment provider: Stripe, Square Payments, or the platform's native checkout
- Menu visibility: Confirm all imported items are set to "active" or "visible"
Once live, use QR codes on table cards, receipts, and in-store signage to connect dine-in guests directly to your ordering URL. QRStuff's dynamic URL QR codes handle this well: if you switch platforms or update your storefront URL later, you can update the destination in the dashboard without reprinting any physical materials.
Dynamic codes also capture scan analytics — time, device, and location — so you can track when customers are actually engaging with your ordering link.
What to Prepare Before You Import Your Restaurant Menu
Skipping prep work is the fastest route to a broken import. Restaurants that upload raw data from a PDF menu or a handwritten list almost always end up with missing items, broken fields, or a storefront that makes no sense to customers.
Gather these assets before starting:
- Complete, current menu with accurate prices for every item
- Written descriptions for each dish — not just names
- Category groupings that match your physical menu structure
- Modifier logic documented: "choose your protein," size options, add-on pricing
- High-quality images for your top-selling items, at minimum
- Allergen and dietary labels (vegan, gluten-free, contains alcohol)
Allergen and dietary labels aren't just nice to have. Errors generate customer complaints and create legal exposure — food labeling regulations are tightening, and online menus are increasingly subject to the same scrutiny as printed ones.
Start by exporting your current menu from your POS, or build a fresh spreadsheet from the platform's sample CSV template. Fill every column before you import — fixing missing fields after the fact takes longer than doing it right upfront.
Which Import Method Is Right for Your Restaurant?
The right choice depends on your menu size, existing technology, and how frequently items change.
CSV/Spreadsheet Import
CSV import works best for restaurants with 20+ items, no existing POS, or those migrating from another platform.
You get full control over how items appear — descriptions, images, variants, and categories are all set before anything goes live. It does require clean data and basic spreadsheet familiarity. One misaligned column can fail the entire import, so this method rewards preparation.
POS Integration or Sync
If you're already on Square, Toast, Clover, or a similar POS, syncing is the lowest-friction path available.
It eliminates duplicate data entry and keeps in-store and online pricing consistent. Update a price in the POS and it reflects online — no separate manual step required.
Manual Entry
Manual entry suits very small menus (under 15 items) or restaurants launching with limited inventory for the first time.
Item-by-item control is useful when items need unique configuration a CSV import won't handle cleanly. At scale, though, inconsistency creeps in fast:
- Mismatched descriptions across similar items
- Image sizes that don't align
- Pricing typos that are easy to miss
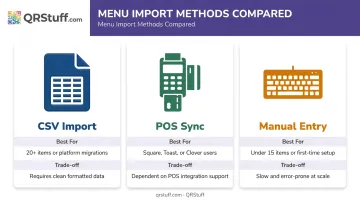
Here's a quick comparison to help you decide:
| Method | Best For | Main Trade-off |
|---|---|---|
| CSV Import | 20+ items, platform migrations | Requires clean, correctly formatted data |
| POS Sync | Existing Square, Toast, or Clover users | Dependent on POS integration support |
| Manual Entry | Under 15 items, first-time setup | Slow and error-prone at scale |
Key Factors That Affect Your Online Menu's Import Quality
Getting items into the platform is only half the job — how you configure them determines whether your online menu actually converts visitors into orders.
Descriptions and Images
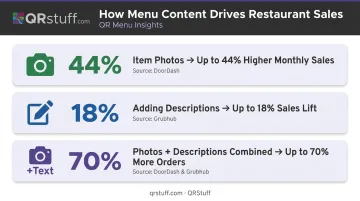
The biggest revenue gap in most online menus comes down to photos and descriptions. According to DoorDash's menu design data, menus with item photos see up to 44% higher monthly sales, while adding descriptions lifts sales by up to 18%. Grubhub reports that menus with both photos and descriptions can receive up to 70% more orders.
A description that names the key ingredients, preparation style, and portion size gives online customers the context they'd normally get from a server. "Pan-seared salmon fillet, lemon caper butter, served with roasted potatoes" consistently outperforms "Salmon" — customers know what they're ordering before they commit.
For images: use consistent lighting and framing across items. Platforms display a blank placeholder for items with no image, which signals an incomplete or untrustworthy store.
Category Structure and Modifier Configuration
Category structure directly affects navigation. Customers scanning a digital menu look for familiar section labels like Starters, Mains, Sides, and Drinks. Poor categorization forces scrolling through irrelevant items and increases drop-off.
Modifiers are equally critical. Restaurant orders are almost always customized — "no onions," "add extra cheese," "choose your sauce." These must be configured as product variants or modifier groups in the platform. When they're missing:
- Customers can't specify their preferences at checkout
- Orders arrive with free-text notes that kitchen staff may miss
- Error rates climb, driving refund requests and negative reviews
- Repeat order rates drop as customers lose confidence in accuracy
Pricing Accuracy
DoorDash's internal study of over 4,500 small business restaurants found that marked-up menu prices led to 37% fewer sales and 78% lower reorder rates. Discrepancies between your physical menu and online store — especially for seasonal items — generate order disputes and refund requests.
Dynamic QR codes connected to a POS-synced platform help keep pricing consistent across channels. If you're using static QR codes pointing to a PDF menu, any price change requires both a menu update and a new QR code reprint.
Common Mistakes When Importing a Restaurant Menu Online
Most import problems are avoidable. Here are the four that consistently derail restaurant online stores.
Skip descriptions and images and you'll end up with a sterile, catalog-like menu — item name and price, nothing else. Restaurants that add photos and descriptions consistently see higher order volume than those that don't.
Incorrect CSV formatting. CSV imports are unforgiving. Common errors include:
- Wrong file encoding (not UTF-8)
- Merged cells in spreadsheet editors
- Currency symbols in price fields (breaks Toast imports)
- Missing variant columns when items have size or option variations
- Using
.xlsformat instead of.csvor.xlsx(Square rejects.xls)
Ignore modifiers and add-ons and customers lose the ability to customize correctly. A free-text "special instructions" field isn't a substitute. It puts the burden on kitchen staff to interpret every note consistently.
Skip testing before publishing and your first real customer becomes your QA team. Place a complete test order — add an item, configure options, check out — before going live. This catches broken images, wrong prices, and checkout errors before they cost you a sale.
Frequently Asked Questions
How do I import my restaurant menu to an online store?
Export or format your menu data as a CSV, then upload it to your platform's admin dashboard. Map the fields to required columns, organize items into categories, and configure fulfillment options before publishing. Most platforms provide a sample template to guide formatting.
What format should my restaurant menu be in before importing?
Most platforms accept a CSV file with columns for item name, description, price, category, and image URL. Review the menu for accuracy and completeness before uploading — fixing missing fields after import is far slower than preparing them upfront.
Can I import my menu using a CSV file?
Yes. Shopify, Square, and Toast all support CSV or spreadsheet bulk imports and publish documentation on required fields. The CSV must be correctly formatted to the platform's specifications: encoding, column headers, and field formats all matter.
What are the best online ordering systems for restaurants?
Common platforms include Shopify, Square Online, Toast, ChowNow, and DoorDash Online Ordering. The key distinction is first-party vs. marketplace: first-party platforms like Square, Toast, and ChowNow are commission-free, while marketplaces like DoorDash and Grubhub charge 15–30% per order.
How do I upload my restaurant menu to Google?
Add your menu through Google Business Profile using the built-in menu editor, where you can enter items, descriptions, prices, and sections manually. You can also connect a supported third-party ordering platform that syncs menu data directly. Changes typically take 24–48 hours to appear on Search and Maps.
Do I need product photos to import my menu to an online store?
Photos aren't required for the import to succeed, but they directly affect sales performance. Platforms show a blank placeholder for items without images, which reduces customer confidence. DoorDash data links item photos to up to 44% higher monthly sales, so treat them as core menu data rather than optional extras.