Combining a wedding website with a QR code RSVP solves most of that friction. Guests scan a code on their invitation, land directly on your RSVP page, and submit their response in under a minute. You get an instant notification. Your guest list updates automatically.
The concept is straightforward, but the execution has real variables. Which platform you choose, whether you use a static or dynamic QR code, how you size and print the code, and when you generate it relative to your invitation timeline all affect whether this works smoothly or creates new headaches. This guide walks through every step, including what to prepare beforehand and what to avoid.
Key Takeaways
- A QR code RSVP links a scannable code on your invitation directly to your wedding website's RSVP page — guests scan and confirm in seconds.
- You'll need a wedding website with an RSVP form, the direct URL to that page, and a QR code generator pointing to that URL.
- Use a dynamic QR code for printed invitations — if your URL changes after printing, you can update the destination without reprinting a single envelope.
- Print at minimum 2cm × 2cm, download in SVG or PDF format, and test on multiple devices before approving your print run.
- Always include the plain-text URL alongside the QR code as a fallback for guests who don't scan.
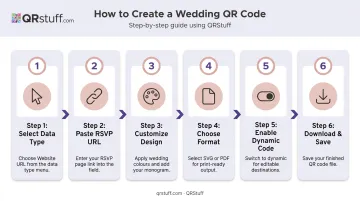
How to Create a Wedding Website with QR Code RSVP
Step 1: Choose a Wedding Website Platform with RSVP Functionality
Not all wedding website builders include built-in RSVP tools. Platforms worth considering:
| Platform | RSVP Support | Custom Domain |
|---|---|---|
| The Knot | Built-in RSVP management, public/private options | $19.99/year |
| Zola | Built-in RSVPs, editable questions, guest tracking | ~$10–$20/year |
| WithJoy | Smart RSVP, meal preferences, plus-one tracking | Via GoDaddy or own registrar |
| WedSites | Custom RSVP form builder, response management | Available (plan-dependent) |
| Squarespace | Customizable form blocks on a dedicated RSVP page | Free first year on paid plans |
Key features to confirm before committing to a platform:
- A direct, shareable URL for the RSVP page specifically (not just the homepage)
- Guest response tracking and email notifications
- Option to set a custom domain or short URL — this matters for QR code stability and aesthetics
Step 2: Build Your Website and Configure the RSVP Form
Before the site is QR-code ready, it needs the essentials:
- Event details (date, time, ceremony and reception venue)
- RSVP form with deadline displayed prominently
- Dress code
- Accommodation and travel information
For the RSVP form itself, keep it short. According to Nielsen Norman Group, removing unnecessary form fields directly increases completion rates. Stick to:
- Guest name(s)
- Attending or not attending
- Meal preference (if your venue requires a headcount by dish)
- Plus-one details
- Dietary requirements or notes
Set your RSVP deadline on the form page — The Knot recommends the deadline fall roughly four weeks before the wedding, with RSVPs due no later than two weeks out. Enable email notifications so you're alerted the moment each guest responds.
Step 3: Copy Your RSVP Page URL
Once your RSVP page is live, copy the direct link to that specific page — not your homepage. This is the URL your QR code will point to.
If the URL looks unwieldy (long platform subdomains, query strings), use a URL shortener like Bitly or connect a custom domain. A cleaner URL is easier to type as a fallback and produces a less dense QR code pattern, which scans more reliably.
Step 4: Generate Your Wedding QR Code
With a clean RSVP URL in hand, a dedicated QR code generator gives you design control and flexibility that free tools don't. On QRStuff, the process is:
- Log in and select "Website URL" as your data type
- Paste your RSVP page URL — always include the
https://prefix - Customize the design — choose colors matching your wedding palette, upload your monogram or initials as a center logo, and adjust module and eye shapes. Design options are available on paid plans.
- Select your download format — choose SVG or PDF for any professional print job. If using a PNG, the file needs to be at least 300 DPI.
- Choose dynamic, not static — on the final step, select dynamic code. Name it and save to a project folder.
- Download and keep the file
QRStuff's dynamic codes use a short redirect URL under the hood. The physical pattern printed on your invitation never changes. If your RSVP page URL ever needs to update, you simply change the destination in your dashboard — no reprinting required.
The platform also tracks real-time scan data (total scans, unique scans, device type, location), so you can see how many guests have opened the invitation before you've received a single RSVP.
Step 5: Add the QR Code to Your Invitations and Test It
Placement: Put the QR code on the details insert card or RSVP card, not on the face of the main invitation. This keeps the primary design clean while giving the code its own space.
Non-negotiable pre-print test:
- Scan on at least one iPhone and one Android device
- Test in normal room lighting, not just optimal conditions
- Confirm the code lands on the RSVP page (not the homepage) with the form loading correctly
- Submit a test response and verify you receive the email notification
Fallback text: Print the plain-text URL directly below the QR code. According to Pew Research, 91% of U.S. adults owned a smartphone in 2024, but smartphone ownership and comfort scanning QR codes aren't the same thing. A typed URL takes two lines of space and ensures no guest gets left out.
What You Need Before Getting Started
Getting the right things locked down before you build saves significant rework later.
Before you create anything:
- Finalise your event details (venue, date, time, dress code) — your RSVP form can't go live with placeholder information
- Decide on your wedding website platform and connect a custom domain before generating the QR code
- Know your approximate guest count — this affects which platform tier and QR plan you need
Avoid free platforms that attach expiring subdomains or could change their URL structure. If you're connecting a custom domain, purchase and point it to your site before generating the QR code. Changing the destination URL after printing is exactly the scenario where a dynamic code saves you.
According to Zola, your wedding website should be live six to eight months before the wedding. Work backward from your mail date using this sequence:
- Invitations reach guests six to eight weeks before the wedding
- Print production requires seven to nine business days minimum
- Your RSVP page, URL, and QR code must be finalised and tested before the proof is approved
Don't wait until invitations arrive to test the code — by then, reprinting is the only fix.
Key Factors That Affect QR Code RSVP Success
Getting a QR code onto an invitation is the easy part. Whether every guest can actually scan it depends on five technical factors — each one worth understanding before you print.
Dynamic vs. Static QR Codes
Static codes embed the destination URL permanently inside the pattern — once printed, the destination cannot change. If you switch platforms, update your domain, or correct a URL typo after invitations go out, static codes become dead links.
Dynamic codes use a short redirect URL. The printed pattern stays the same, but the destination is managed through your QRStuff dashboard and can be updated as needed. For wedding invitations — which go out weeks before the event and use URLs that might change — dynamic is the only practical choice.
Print Size and Resolution
QRStuff's guidance sets the minimum at 2cm × 2cm (approximately 0.8 inches). Larger is safer, particularly for codes with logos or color customization. For resolution:
- SVG or PDF: Vector formats, infinitely scalable, always sharp — the recommended choice for any professional print job
- PNG: Use at 300 DPI minimum. A 72 DPI screen export in a print layout will produce a blurry, unscannable code.
Color and Contrast
QR code scanners work by detecting dark modules against a light background. A few principles apply consistently:
- Dark on light always — this is the most reliable combination
- Avoid inverted designs (light code on dark background) — older scanners struggle with these
- If using custom wedding colors, the dots must be at least 70% darker than the background
- Foil finishes and metallic inks interfere with scanning — keep the code itself matte
Quiet Zone and Placement
Every QR code requires a clear margin — called the quiet zone — of at least four modules (blocks) on all sides. Placing the code on a textured, patterned, or heavily decorated area of the stationery compresses this space and reduces scan reliability. The code needs clean white space surrounding it to work correctly.
Testing Across Devices
Apple and Android both document native QR scanning through the camera app, but scanning behavior varies between devices and operating systems. A code that scans perfectly on one phone may struggle on an older model with a lower-quality camera.
Test on at least one iPhone, one Android, and ideally an older phone from someone in your family. Test the printed proof, not just the on-screen version — paper texture, print quality, and lighting conditions all affect real-world performance.
Common Mistakes to Avoid
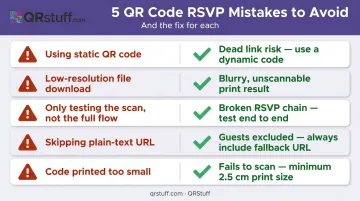
- Using a static QR code — the most costly mistake at the printing stage. If anything changes with your URL after invitations are mailed, a static code leads guests to a dead link with no way to fix it.
- Downloading a low-resolution file — a PNG exported at screen resolution (72 DPI) in a print layout will be blurry. Always download SVG, PDF, or a 300 DPI PNG for anything going to a printer.
- Only testing the scan, not the full flow — reaching the website homepage is not enough. Submit a test RSVP through the form and confirm the notification arrives. The whole chain needs to work.
- Skipping the plain-text URL — not every guest will feel comfortable scanning a QR code, particularly older relatives or those less familiar with smartphones. Two lines of fallback text prevents anyone from missing the RSVP process entirely.
- Making the code too small — couples often reduce the QR code size to fit a design, crossing below the minimum scannable threshold without realizing it. When in doubt, give it more space.
Other Ways to Use QR Codes at Your Wedding
The same setup you've already built for RSVPs works for several other moments on the day itself.
Guest Photo Sharing at Reception Tables
A QR code on table cards or centerpieces can link to a shared Google Photos album where guests upload candid shots directly from their phones. Google Photos supports shared album QR codes natively, and this has become a practical replacement for disposable cameras — guests already have their phones out.
Digital Menus and Ceremony Programs
A QR code on a table tent or program cover links to a digital menu (including allergen information) or a full ceremony order of service. The National Restaurant Association's 2024 Technology Landscape report found that 59% of full-service restaurant customers would access a menu via QR code — so your guests already know the drill.
Going digital also cuts printing costs, which adds up fast for destination weddings with large guest counts.
Both use cases can be set up as additional dynamic QR codes in the same QRStuff dashboard where you manage your RSVP code, under the same account you're already using for RSVPs.
Frequently Asked Questions
Can guests RSVP through a wedding website?
Yes. Most modern wedding website platforms — The Knot, Zola, WithJoy, WedSites — include built-in RSVP forms. Guests scan the QR code on the invitation, land on the RSVP page, and submit their response directly. The couple's guest list updates in real time.
How do I include hotel information on my wedding website?
Add a dedicated "Travel & Accommodation" section listing recommended hotels, any room block discount codes, and driving or transit directions. A QR code can also link directly to a Google Maps pin for the venue, making navigation simple for out-of-town guests.
Do I need a paid plan to create a QR code for my wedding?
QRStuff's Free Suite includes dynamic QR codes, but they expire after 30 days and are capped at 50 scans — both limits make it impractical for a multi-month invitation window. A paid plan (Lite Suite at £4/month) removes expiration limits, unlocks full design customisation, and adds analytics. For most weddings, that's the minimum practical tier.
What size should a QR code be on a wedding invitation?
QRStuff recommends a minimum of 2cm × 2cm (approximately 0.8 inches) for simple URL codes. Larger is always safer, and any code with a logo or color customisation should be sized up. Export in SVG or PDF for print — never use a screen-resolution PNG.
Can I update my wedding website QR code after sending invitations?
Only if it's a dynamic code. Static codes cannot be changed after generation. Dynamic QR codes on QRStuff can have their destination URL updated any number of times through the dashboard, without any change to the printed code.
Should I include both the QR code and the website URL on my invitation?
Yes. Including the plain-text URL alongside the QR code ensures guests who are unfamiliar with scanning, or who don't have a compatible smartphone, can still access the RSVP page by typing the link manually. It takes minimal space and prevents any guest from being excluded.