
The technical side of generating a QR code takes minutes. The part that trips people up is everything around it — choosing the wrong code type, printing it too small, linking to a page that requires a login, or skipping the pre-print test. Any of these can result in a code that frustrates guests or fails entirely.
This guide covers the full process: what your code should link to, how to generate and customize it, the design parameters that determine whether it scans reliably, and the mistakes worth avoiding before you send anything to print.
Key Takeaways
- Dynamic QR codes let you update the linked destination after printing, so event detail changes never require a reprint
- Always print at a minimum of 2cm × 2cm with a clear white quiet zone border around the code
- Link to a page that's publicly accessible, mobile-optimized, and loads fast
- Test on both iOS and Android devices before approving for print
- QRStuff supports 40+ QR code types with real-time scan analytics to track guest engagement
How to Create QR Codes for Invitations
Step 1: Decide What Your QR Code Will Link To
Before generating anything, you need a live, publicly accessible destination. The most common options for invitation QR codes:
- RSVP form — Google Forms, Typeform, or a dedicated wedding website RSVP page that collects meal preferences, dietary restrictions, and attendance confirmation
- Event website — a full details page with venue, schedule, accommodation, and registry
- PDF itinerary — useful for multi-day events or destination weddings; platforms like QRStuff host the file directly so no external URL is needed
- Directions/map link — a Google Maps or Apple Maps URL for venues that are hard to find
- Photo-sharing gallery — lets guests upload photos from the event in real time
Whatever you choose, confirm two things before generating the code: the page loads without requiring a login, and it renders correctly on a mobile screen. A gated RSVP page or a PDF that won't open on iPhone will frustrate guests and drop your response rate.
Step 2: Choose Between a Static and Dynamic QR Code
The code type you choose determines whether you can fix mistakes after printing — and whether you get data on who scanned it.
| Static QR Code | Dynamic QR Code | |
|---|---|---|
| Destination | Permanently encoded | Editable from your dashboard |
| After printing | Cannot be changed | Update anytime, no reprint needed |
| Scan analytics | None | Timestamps, device types, location data |
| Best for | Simple, one-use links | Invitations, events, anything with moving parts |
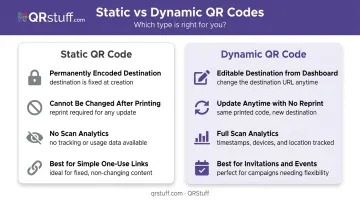
For invitations, dynamic codes are the practical choice in almost every situation. If your venue shifts, your RSVP link expires, or you catch a typo after mailing — you fix it in your dashboard, not at the printer.
On QRStuff, dynamic codes are available on paid plans. The free plan includes dynamic codes but applies scan and time limits, making it unsuitable for most events.
Step 3: Generate and Customize Your QR Code
With your destination confirmed and code type chosen, open QRStuff and follow these steps:
- Select your QR code type — URL for a web page, PDF for an uploaded file, or Event for structured event details. QRStuff supports dedicated types for weddings, Eventbrite events, Google Forms, and standard URLs.
- Enter your destination — paste the URL or upload the PDF directly. QRStuff hosts uploaded files on their servers, so no separate file hosting is required.
- Customize the design — adjust module shapes, colors, gradients, and embed a logo if needed. QRStuff supports full color customization (foreground, background, finder patterns, alignment elements) and gradient effects across multiple orientations.
- Logo embedding — if you're adding a logo or monogram, QRStuff automatically raises the error correction level to compensate for the coverage. Level H (30% data recovery) is the appropriate setting for any code with a design overlay, and the platform handles this automatically.
One practical note on color: dark modules on a white or off-white background scan reliably. Dynamsoft's scanning research identifies low contrast as one of the most common QR code failure causes — the foreground should be at least 40% darker than the background. Dark navy, deep green, or burgundy work if black doesn't fit your palette. Avoid placing the code over any patterned or textured area of the invitation.
Step 4: Test the QR Code Thoroughly
Never send a QR code to print without testing it first.
- Scan on at least one iOS device and one Android device using the native camera app
- Test from multiple angles and distances (30–60cm is a typical scanning range)
- Verify the destination page loads fully and any RSVP form or interactive element works
- Check under different lighting — screens display codes differently than printed paper
Print a test copy at actual size and scan that too. Colors, contrast, and resolution can shift between screen and paper, and what scans easily on your monitor may fail on a matte cardstock print.
Step 5: Download in the Right Format and Place It on Your Invitation
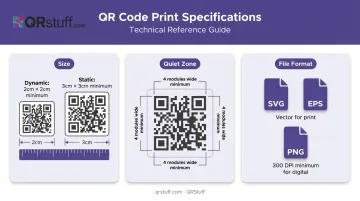
File format: Download as SVG or EPS for professional printing — these vector formats scale to any size without pixelation. For standard printing or digital use, a high-resolution PNG at 300 DPI minimum is sufficient. QRStuff provides all of these formats on paid plans.
Minimum print size: 2cm × 2cm for dynamic QR codes; 3cm × 3cm for static codes. For larger-format uses like welcome signs or table banners, scale proportionally — at least 8–10cm wide for an A2 sign.
Quiet zone: Per DENSO Wave's QR code specifications, the code requires a clear margin of at least four modules wide on all sides. Never crop this border — it's what allows the scanner to distinguish the code from surrounding design elements.
Placement options:
- Back of the main invite (keeps the front uncluttered)
- RSVP or details enclosure card (most popular choice)
- Save-the-dates and welcome signs at the venue
When Should You Add a QR Code to Your Invitations?
QR codes add real value in specific scenarios — and add friction in others.
Best use cases:
- Weddings with large guest lists where RSVP tracking and meal collection would otherwise require manual follow-up
- Corporate events requiring registration confirmation, agenda access, or ticketing
- Destination events where guests need travel logistics, accommodation links, or maps
- Milestone celebrations (birthdays, baby showers) with menus, photo galleries, or gift registries
- Any event where details are subject to change after invitations are printed
Where they add less value:
- Very small gatherings (under 10–15 people) where a direct message or verbal RSVP is simpler
- Guest lists with a significant proportion of older adults who may be less comfortable scanning QR codes — even though Pew Research reports 78% of U.S. adults 65+ own a smartphone, comfort with QR scanning specifically is uneven
If you're uncertain, include a printed URL as a backup. It takes up minimal space and ensures no guest is left without a way to respond.
Key Design Parameters That Affect Scannability
A QR code's reliability in print comes down to four variables. Getting any one wrong is enough to cause failures.
Size
The minimum recommended size is 2cm × 2cm for dynamic codes and 3cm × 3cm for static codes. Below these thresholds, the individual modules (the small squares that make up the code) become too fine for most phone cameras to resolve, particularly in lower light.
For large-format applications — welcome signs, banners, table displays — scale up proportionally. A code on an A2 sign should be at least 8–10cm wide.
Color Contrast
QR codes work by optical contrast between dark modules and a light background. Inverted codes (light modules on a dark background) regularly fail with standard camera apps. Pastel-on-white combinations are also unreliable.
If your invitation palette requires a non-black code, use dark navy, deep burgundy, or forest green — and test it on a physical print before approving the full run. Never place the code over a patterned, textured, or photographic background.
Error Correction Level
QR codes include built-in error correction at four levels — L, M, Q, and H. According to DENSO Wave, Level H allows up to 30% of the code's data to be damaged or obscured while still scanning correctly. This is the appropriate level whenever a logo or design element overlays the center of the code.
When you add a logo through QRStuff, the platform automatically adjusts to the higher error correction level — no manual setting required.
Static vs. Dynamic
For invitations, static codes create unnecessary risk. If venue details change, your RSVP form expires, or the destination URL breaks after the print run is complete, a static code cannot be updated.
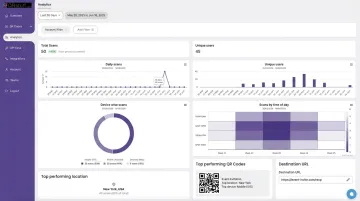
Dynamic codes (available on QRStuff's paid plans) solve this by keeping the destination editable after print. They also include scan analytics, so you can track guest engagement before your RSVP deadline:
- Update destination URLs at any time from the dashboard
- Track when, where, and on what device each scan occurred
- Monitor response rates leading up to your event
- Identify whether guests are engaging before or after your reminder sends
Common Mistakes When Creating QR Codes for Invitations
Avoid these four mistakes before your invitations go to print:
- Use dynamic codes, not static ones — if your venue, date, or RSVP link changes after mailing, a static code is permanently broken and can't be updated
- Size and background matter — print at a minimum of 2–3cm, keep the quiet zone intact, and never place the code over a patterned or dark background
- Always test a physical proof — screen testing won't catch color shifts or resolution loss on cardstock; scan a printed copy before approving the full run
- Check your destination on mobile data — RSVP forms requiring login, non-mobile PDFs, or slow-loading pages will all cut response rates; test on a cellular connection, not Wi-Fi
Troubleshooting QR Code Issues on Invitations
Most QR code problems on invitations fall into three categories: the code won't scan, it scans to the wrong place, or guests hit a dead end once they arrive. Here's how to fix each one.
QR code won't scan at all
Likely cause: Code printed too small, insufficient contrast, missing quiet zone, or placed over a textured or patterned area.
Fix: Verify the code meets minimum size requirements, ensure a clean white margin on all sides, increase contrast between modules and background, and if problems persist, regenerate at a higher error correction level.
QR code scans but leads to a wrong or broken page
Likely cause: Static code pointing to a destination that changed or went offline — or a typo in the URL at the time of generation.
Fix: If invitations are already printed, update the redirect from your QRStuff dashboard (dynamic codes only) so the existing code points to the correct page. Going forward, verify the URL before generating and scan-test before sending to print.
QR code scans correctly but guests can't complete the RSVP
Likely cause: Destination requires a login, isn't mobile-optimized, times out on slower connections, or the RSVP form has closed.
Fix: Confirm the page is publicly accessible without any authentication. Test on mobile data, not Wi-Fi, to replicate guest conditions. If using a form, verify it's still accepting responses ahead of your event date.
Frequently Asked Questions
Can I generate a QR code for free?
Yes — QRStuff's free plan includes basic static and dynamic QR codes. The free dynamic codes expire after 30 days with a 50-scan limit, which isn't sufficient for most events. Paid plans starting at £4/month remove those restrictions and add scan tracking and custom branding.
What should a QR code on an invitation link to?
The most useful destinations are an RSVP form, a wedding or event website, a PDF itinerary, or a map/directions link. The best choice depends on what guests need most. For weddings, an RSVP page is the clear priority.
What size should a QR code be on a printed invitation?
Minimum 2cm × 2cm for dynamic codes, 3cm × 3cm for static. Always maintain a clear white border (quiet zone) of at least four modules wide around all sides of the code.
Can I change where my QR code links after the invitations have been printed?
Only if you used a dynamic QR code. The printed code stays the same, but you can update the redirect destination at any time from your QRStuff dashboard — no reprinting required.
Do guests need a special app to scan a QR code?
Most modern smartphones can scan QR codes using the built-in camera app — iOS 11+ and Android 9+ both support native scanning. Guests on older devices may need a free third-party scanner app, which takes under a minute to install.
What's the difference between a static and dynamic QR code for invitations?
A static code permanently encodes the destination and cannot be changed after creation. A dynamic code stores a redirect you control, allowing destination updates at any time and providing scan analytics. For event invitations, dynamic is the better choice.