There are two distinct versions of this technology. The first links customers to a PDF or URL where they can download and print a label themselves. The second is a carrier-issued code that drop-off staff scan to print the label on-site—no printer needed at all. Understanding which type fits your setup determines everything about how you build and deploy these codes.
The stakes are real. According to NRF and Happy Returns research on 2024 retail returns, 67% of consumers say a negative return experience would stop them shopping with a retailer again—and 84% are more likely to shop with a brand offering no-box, no-label returns.
Key Takeaways
- A return label QR code links customers to a printable label or acts as a carrier-issued code staff scan and print on-site
- Generate one by creating a return label through a carrier portal, then encoding the URL or PDF into a QR code via QRStuff
- Customers pack the item, show the QR code at an eligible USPS, FedEx, or UPS drop-off, and staff handle the label
- Dynamic QR codes let you update the return destination anytime without reprinting packaging
- Common failures: static codes that break when URLs change, no drop-off guidance for customers, and missed expiration windows
What Is a Return Label QR Code?
A return label QR code is a scannable code that does one of two things:
- PDF/URL label: The customer scans the code, downloads a PDF, and prints the label at home before heading to a drop-off location
- Printerless carrier code: The customer presents the QR code at a drop-off counter, staff scan it, and the label prints on-site
The PDF/URL version works anywhere a customer has a printer. The printerless version is more convenient, but it requires a carrier system that supports it and a customer visit to a participating location.
Which Carriers Support QR Code Returns?
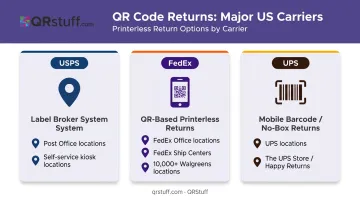
All three major US carriers have built infrastructure for this:
| Carrier | System | Eligible Locations |
|---|---|---|
| USPS | Label Broker (QR + 8–10 character code) | Post Office locations with Label Broker at the counter or self-service kiosk |
| FedEx | QR-based printerless returns | FedEx Office, FedEx Ship Centers, and 10,000+ Walgreens locations |
| UPS | Mobile barcode / no-box returns | UPS locations and The UPS Store (Happy Returns) |
Each carrier provides a location finder so customers can confirm whether a specific branch supports QR printing. Include that link directly in your return instructions.
How to Generate a Return Label QR Code
Here's the business-side workflow for creating and deploying return label QR codes. The steps vary slightly depending on whether you're creating a self-serve PDF link or a carrier-managed printerless code.
Step 1: Create the Return Shipping Label
Generate the return label through your carrier portal or shipping platform:
- USPS: Use Click-N-Ship and select "Print later at Post Office" to generate a Label Broker ID
- FedEx: Use FedEx Returns Technology or the FedEx Mobile app to generate a QR-based return code
- UPS: Create the return label — UPS issues the mobile barcode alongside it
- Third-party platforms: Stamps.com, EasyPost, and ShipStation all support Label Broker or no-box return workflows
If you're hosting a PDF label yourself, upload it to a stable, publicly accessible URL — avoid local file paths or temporary links.
Step 2: Choose the Right QR Code Type
Two options fit most return label scenarios:
- URL QR code: Best for linking to a web-based return portal or a hosted label download page
- PDF QR code: Best when the label itself is a PDF file — QRStuff's PDF type hosts the file directly on the platform, so you don't need external file storage
Use dynamic QR codes, not static ones. Dynamic codes let you update the destination URL at any time — no reprinting of packaging or packing slips required. Static codes lock in the URL permanently, so a carrier switch or portal change renders every printed code useless.
Step 3: Generate the QR Code
In QRStuff, the workflow is simple:
- Log in and select Website URL or PDF as the data type
- Paste the return label URL or upload the PDF file directly
- Choose dynamic as the code type (required for updating and tracking)
- Name the code and assign it to a project folder for organization
For retailers managing multiple SKUs or return flows, two additional features are worth knowing:
- Bulk generation: Create up to 500 return label QR codes per batch on the Full Suite plan, with unlimited batches on Enterprise
- API access (Enterprise): Generate return label codes programmatically, tied to individual order numbers or customer records
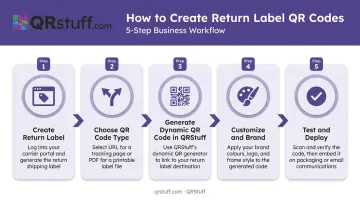
Step 4: Customize and Brand the Code
A branded QR code scans better and signals legitimacy. Customers are more likely to scan a code that looks intentional than an anonymous black-and-white square.
In QRStuff, you can:
- Add brand colors and logo (automatically centered at optimal size)
- Apply a call-to-action frame such as "Scan to Return"
- Customize module shapes and corner patterns
Two non-negotiable technical rules apply before you finalize the design:
- Contrast: The code must be significantly darker than its background — QRStuff recommends at least 70% darker. Avoid light-on-dark inversions.
- Quiet zone: Never crop the white border around the code. It must be at least 4× the width of a single data square.
For print on packing slips or inserts, download in SVG or EPS format — these vector formats scale without quality loss at any print size.
Step 5: Test, Then Deploy
Before any code goes live, scan it on both iOS and Android. Confirm it resolves to the correct destination and that the landing page loads cleanly on mobile.
Deploy the QR code across the right touchpoints:
- Inside packaging inserts or on the packing slip
- In the return initiation or order confirmation email
- On the retailer's dedicated returns portal page
Dynamic QR codes in QRStuff feed real-time scan data into the analytics dashboard — total scans, unique scans, device type, geographic location, and time-based patterns. For returns, this tells you how many customers are initiating returns via QR, from which regions, and on which devices.
How to Use a Return Label QR Code (Customer's Perspective)
If you've received a QR code from a retailer and aren't sure what to do with it, here's the process.
Step 1: Locate and Save the QR Code
Find the QR code in your return confirmation email, on the packing slip, or on the retailer's returns portal. Screenshot it or keep the email open on your phone. If the code links to a PDF label rather than a printerless service, download and print that label at home before proceeding.
Step 2: Pack the Item
Place the item in an appropriately sized box or bag and include any documentation the retailer specifies (return slip, order number, etc.). For printerless returns, do not attach any label—the drop-off staff will generate and attach it after scanning your code.
Step 3: Show the QR Code at an Eligible Drop-Off Location
Not every branch of every carrier supports QR scanning. Here's where to go:
- USPS: Post Office locations with Label Broker at the counter or a Label Broker self-service kiosk (use the USPS location finder with the Label Broker filter)
- FedEx: FedEx Office, FedEx Ship Centers, and participating Walgreens locations
- UPS: UPS locations accepting mobile barcodes, or The UPS Store for Happy Returns no-box returns
Show the QR code on your phone screen. Staff scan it, print the label, and attach it to your package.
Step 4: Collect a Receipt and Track the Return
Always ask for a drop-off receipt. The tracking number on that receipt (or in your return email) lets you confirm the package is moving back to the retailer.
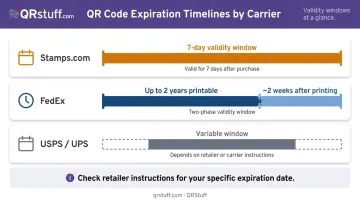
QR codes have expiration windows, so timing matters. Stamps.com Label QR codes expire within 7 days of purchase. FedEx emailed return labels are typically printable for up to two years, but once printed, usually expire within two weeks.
Always check the retailer's return instructions for the specific window. Use the code promptly once you receive it.
When Return Label QR Codes Make Sense (and When They Don't)
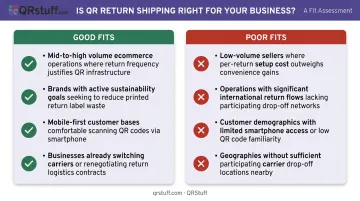
QR code returns work well in some operations and create unnecessary friction in others. The difference usually comes down to order volume, carrier infrastructure, and who your customers are.
Good fits:
- Mid-to-high volume ecommerce operations where printing and inserting labels with every order adds real cost
- Brands with sustainability goals looking to reduce paper waste across shipments
- Mobile-first customer bases already comfortable with QR scanning (Pew Research found 91% of US adults own a smartphone as of 2025)
- Businesses that periodically update return policies or switch carriers and need to change label destinations without reprinting packaging
Poor fits:
- Very small-volume sellers processing a handful of returns monthly—emailing a label directly is simpler
- International return flows where carrier QR support is limited or absent
- Customer demographics with limited smartphone access or lower QR familiarity
- Geographies where the retailer's carrier of choice doesn't have participating drop-off locations nearby
Common Mistakes to Avoid
Three overlooked details cause the majority of QR code return failures — and all three are preventable.
Using a static code for a changing destination. If your return portal URL changes or you switch carriers, a static code becomes a dead link. Every printed packing slip, box insert, or email template carrying that code breaks instantly. Use dynamic QR codes for return labels so you can redirect the destination without reprinting anything.
Leaving customers to guess which locations support QR scanning. Carriers frequently accept QR codes at some drop-off points but not others. Customers who drive to an unsupported location don't forget that experience — and they don't return. Include a direct link to the carrier's location finder in every return email alongside the QR code.
Generating codes too far in advance. Carrier-managed codes often carry tight validity windows. Create QR codes as close to the return initiation moment as possible, and communicate the expiration date clearly in your return instructions.
Frequently Asked Questions
How do I get a QR code for a return label?
There are two sources. Retailers send one via email or include it in packaging after you initiate a return. Businesses generate one using a QR code platform like QRStuff by encoding the return label URL or PDF. The method depends on how the retailer has set up their returns process.
How do I get a QR code for a USPS return label?
USPS return QR codes come through USPS Label Broker, accessible via USPS Click-N-Ship or third-party platforms like Stamps.com and EasyPost. You receive the Label Broker ID (a QR code plus an alphanumeric code) by email and present it at a participating Post Office, where staff print the label on-site.
Can a return label be a QR code?
Yes. USPS, FedEx, and UPS all support QR-based printerless returns where the code replaces a traditional printed label entirely. Staff at eligible drop-off locations scan the customer's QR code and print the label on-site—no home printer required.
Can I print a return label from a USPS QR code?
A USPS Label Broker QR code is designed to be printed at the Post Office by staff—not at home. However, if a retailer sent a PDF QR code linking to a downloadable label, you can open that PDF and print it at home yourself.
Do I need a printer to use a return label QR code?
With carrier-issued printerless codes (USPS Label Broker, FedEx, UPS mobile barcode), no home printer is needed—staff print the label at drop-off. If the QR code links to a PDF label instead, you'll need to print it at home or at a local print shop.
How long is a return label QR code valid?
It varies by carrier:
- Stamps.com: QR codes expire within 7 days of purchase
- FedEx: Labels are printable for up to two years but expire ~2 weeks after printing
- USPS Label Broker / UPS: Validity windows depend on the specific service
Always check the retailer's return instructions for the exact expiration date.