This guide covers the complete process: what to prepare before your event, how to configure codes and connect them to your registration system, how to run check-in on the day, and how to handle failures when they happen.
Key Takeaways
- Use dynamic QR codes so you can update destination URLs after materials are printed
- Each attendee needs a unique QR code tied to their registration record, not a shared code for everyone
- Test the full scan-to-submission flow on actual venue hardware before the event
- Equip staff with a scanning app, a live attendee list, and a printed backup list
- Post-event scan data — timestamps, device types, unique scans — informs future event planning
When Should You Use QR Codes for Event Check-In?
QR check-in earns its setup cost when attendee volume, entry speed, or data accuracy are priorities. At events with 50 or more attendees, manual name lookups create real queues. Once a line forms at the door, it compounds fast.
QR check-in is also regularly misapplied. Three scenarios where the setup overhead outweighs the benefit:
- Small informal gatherings (under 20 people) where a host greeting attendees at the door is faster than any digital system
- Venues without reliable connectivity: real-time attendance validation requires WiFi or cellular at entry points; without it, the system breaks
- Multi-session conferences where session-level tracking is required — a single QR code per attendee won't handle this; you need a more complex architecture with session-specific codes or a dedicated event app
Understanding which scenario you're in also means knowing which type of QR code you actually need — because registration and check-in codes aren't the same thing.
Registration QR Codes vs. Check-In QR Codes
These two functions are often conflated, but they serve different purposes in the workflow:
| Type | When Used | What It Does |
|------|-----------|--------------|
| Registration QR code | Pre-event | Directs attendees to an RSVP or ticket purchase page |
| Check-in QR code | Day of event | Presented by the attendee at entry for identity validation |
Both can exist in the same event workflow. A registration QR code on your promotional materials drives sign-ups. A check-in QR code in the attendee's confirmation email gets them through the door. They're separate codes with separate jobs.
What You Need Before Setting Up
Get these three things confirmed before you build anything:
1. A dynamic QR code generator with editable destination URLs
Static QR codes are permanent: if your registration form URL changes after you've distributed printed materials, the code breaks. Dynamic codes let you swap the destination without reprinting. QRStuff generates dynamic codes with real-time scan tracking, so you can monitor check-in activity as it happens.
2. A mobile-optimised registration page
A slow registration page kills momentum right at the door. Google's Core Web Vitals guidelines recommend a Largest Contentful Paint under 2.5 seconds — pages that miss this threshold see measurably higher drop-off rates. Test your form on a mobile device before the event, not just on desktop.
3. Confirmed connectivity at venue entry points
Cvent's OnArrival documentation recommends a minimum of 5 Mbps dedicated wired internet at check-in stations. Venue WiFi that holds up in a test environment can buckle under 200 simultaneous connections. Before the event, confirm bandwidth specs directly with the venue coordinator.
How to Set Up QR Codes for Event Check-In and Registration
Setting up QR codes for check-in involves three sequential steps: creating the codes, connecting them to your registration system, and distributing them to attendees. Getting each step right prevents the failures that tend to surface at the worst possible moment — the entry queue on event day.
Creating Your QR Code
Generate a dynamic QR code linked to your event registration page or check-in landing page. The dynamic format means you can update the destination URL after distribution if your registration platform changes or the form URL shifts.
For check-in specifically, you have two options:
- Single shared QR code — all attendees scan the same code leading to a check-in confirmation page. Simple to set up, but offers no individual tracking and can't prevent sharing.
- Unique per-attendee QR codes — each attendee receives a code tied to their registration ID in their confirmation email. More secure, prevents duplication, and enables individual attendance tracking.
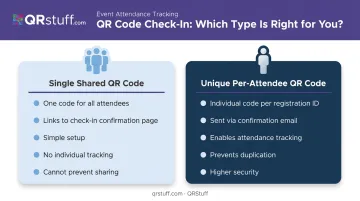
Per-attendee codes are the right choice for any event where entry control or attendance data matters. QRStuff supports bulk generation of unique codes — up to 500 per batch on the Full Suite plan, with unlimited batch processing on Enterprise. For large conferences, you can generate a unique code for every registrant using an Excel file upload.
Linking to Your Registration System
When an attendee scans and submits through your registration page, your system needs to mark their record as checked in within your attendee management system. This typically requires either:
- A native integration between your QR code platform and your event software
- A webhook or API call that updates the attendee's status on submission
QRStuff's Enterprise plan includes full API access and integrations via Zapier, Workato, and Make — useful for connecting to platforms like Eventbrite or a custom registration system.
Before distributing any codes, test the complete scan-to-submission flow on both iOS and Android devices. Browser defaults, permission settings, and OS versions can all affect whether a scan resolves correctly.
Both iPhone and Android 13+ support native QR scanning through the camera app without a separate reader app. That said, confirming behavior on the actual venue's network is different from testing on your office WiFi — run a final check on-site.
Distributing QR Codes to Attendees
With your system tested and integrations confirmed, distribute codes based on your check-in format.
For per-attendee codes: Send the unique QR code in the confirmation email immediately after registration. Include:
- Clear instructions to save the code to their phone or print it
- A fallback confirmation number in case the code doesn't display correctly on their device
- The event name, date, and location in the same email (reduces support queries)
For shared codes used in walk-in registration: Display the code at a minimum at:
- Venue entry points
- Near registration tables
- On any pre-event printed materials
QRStuff recommends a minimum size of 2cm × 2cm for close-range scanning, and applies the 10:1 rule for signage: if attendees will scan from 3 metres away, the code needs to be at least 30cm wide. Keep a dark code on a light background, with dots at least 70% darker than the background. Never crop the quiet zone, the white border surrounding the code that scanners need to isolate the pattern.
Running QR Code Check-In on Event Day
Check-In Station Setup
Each check-in station needs three layers, not one:
- Scanning device — smartphone or tablet with a QR scanning app already open, tested, and logged in
- Live attendee list — accessible on the device for manual verification when codes fail
- Printed backup list — last resort, but necessary
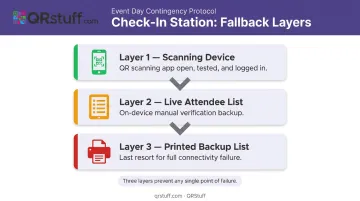
Having all three prevents a single point of failure from creating a queue. If the app fails, staff have the live list. If connectivity drops, staff have the printed list.
What Happens at the Moment of Scan
The sequence should be: scan → system matches code to registration record → attendee is marked present → green confirmation screen appears. If the code has already been scanned, the system flags it rather than confirming entry.
That "already used" flag is how duplicate entry is prevented. Eventbrite documents this behaviour explicitly — if a ticket's QR code has already been used, an error message appears on rescan. Train staff not to override this flag without manager approval, since the entire duplicate-entry prevention model depends on that policy holding.
Handling the Three Most Common Failures
| Failure | Cause | Fix |
|---|---|---|
| Code won't scan | Low screen brightness, cracked screen | Ask attendee to increase brightness or pull up code from confirmation email |
| Code shows as invalid | Code not in system, wrong event | Cross-reference confirmation number against attendee list |
| Connectivity lost | Venue WiFi failure | Switch to offline attendee list if app supports it, or use printed backup |
Real-Time Monitoring During Check-In
Whoever manages check-in should have the QRStuff analytics dashboard open throughout entry. The dashboard shows unique scans, total scans, scan timestamps, and device types in real time.
If scan velocity spikes and then stalls, a specific station likely has a problem: app crash, connectivity issue, or a landing page error. Catching this early — while the queue is still short — is far easier than troubleshooting with a backlog.
At the close of the check-in window, export the attendance report. QRStuff exports in Excel, PDF, and CSV formats. This report becomes the authoritative record of attendance numbers, no-show rates, and walk-up conversion — and should be retained for post-event reporting.
Best Practices for Consistent QR Code Check-In
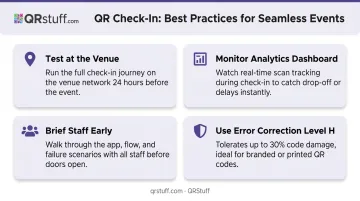
Even a well-designed QR check-in system can break down without proper preparation. These four practices cover the gaps that most teams miss.
- Test at the venue, not the office. Run the full attendee journey — scan, page load, form submission, confirmation — on the actual venue network at least 24 hours before the event. Venue WiFi under 200 simultaneous connections behaves differently from your office router.
- Watch your analytics dashboard during check-in. If scans spike and then drop off, something has broken at a specific station. QRStuff's real-time scan tracking lets you catch issues before the queue builds.
- Brief staff before doors open — not five minutes before. Walk through the scanning app, the confirmation flow, and every failure scenario. The most common check-in failure is a staff member who doesn't know how to handle an edge case, not a technology failure.
- Use error correction wisely. QR codes include built-in error correction. At Level H, roughly 30% of the code can be damaged or obscured and still scan correctly. Choose Level H for branded codes with logos, or for codes printed on materials that may get folded or scratched.
Frequently Asked Questions
Can attendees use QR codes for self-check-in without staff present?
Self-check-in kiosks work when paired with a clear confirmation flow, on-screen instructions, and an alert system so staff can respond when something goes wrong. They work best for low-volume or low-security events where full staff coverage isn't practical.
What happens if an attendee's QR code doesn't scan at check-in?
Staff should have either a printed or offline-accessible attendee list as a fallback. Attendees should also receive a confirmation number in their registration email — this becomes the secondary identifier when the code fails to scan.
Should I use a static or dynamic QR code for event registration?
Dynamic codes are strongly recommended. They let you update the destination URL if your registration form moves, and they provide real-time scan tracking that static codes cannot match.
How many QR code check-in stations do I need?
Plan for peak arrival time, not average. A common starting point is one staffed station per 100–150 attendees expected during the busiest 30-minute window, though this varies by event format.
Can QR codes track attendance data in real time during an event?
Yes. Dynamic QR codes with scan tracking — available in platforms like QRStuff — record each scan with a timestamp and device type, giving organizers a live view of check-in velocity and total attendance as the event progresses.
How do I prevent duplicate or fraudulent QR code check-ins?
Use unique per-attendee QR codes tied to a registration ID. The system flags any code that has already been scanned. Staff should be trained not to override duplicate alerts without explicit authorization from a manager.